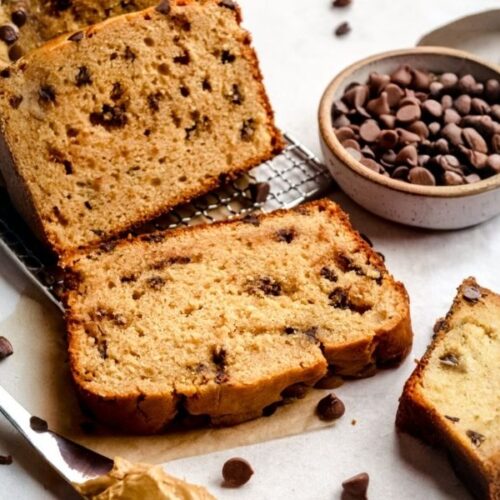
This Peanut Butter Quick Bread with Chocolate Chips is a decadent yet wholesome treat that blends creamy peanut butter richness with bursts of melty chocolate in every slice.
What makes it stand out is its perfectly moist crumb, achieved without complicated steps or specialty ingredients.

One-Bowl Peanut Butter Quick Bread
Equipment
- 1 × 9×5 inch loaf pan
- 1 × Stand mixer with paddle attachment (or handheld mixer)
- 1 × Silicone spatula
- 1 × Mixing bowl (large)
- 1 × Mixing bowl (medium)
- 1 × Measuring cups set
- 1 × Measuring spoons set
- 1 × Cooling rack
Ingredients
- 1 ½ cups 180 g all-purpose flour
- 2 ½ teaspoons baking powder
- 1 teaspoon salt
- 1 cup 240 g creamy peanut butter (no-stir variety)
- ½ cup 100 g granulated sugar
- ½ cup 100 g light brown sugar, packed
- 2 large eggs room temperature
- 1 teaspoon vanilla extract
- 1 cup 240 mL buttermilk (or homemade substitute)
- ⅔ cup 112 g chocolate chips (any type or mix of milk/semi-sweet/mini)
- Coarse sugar for sprinkling (optional)
Instructions
- Prepare Your Baking Equipment: Preheat your oven to 350°F (177°C) so it’s ready when your batter is done. Lightly grease a 9×5-inch loaf pan with non-stick cooking spray, making sure to coat all sides and corners. For added insurance against sticking, you can line the bottom and sides of the pan with parchment paper, leaving a small overhang on two sides to act as handles for easy lifting later.
- Combine the Dry Ingredients: In a large mixing bowl, whisk together 1 ½ cups (180 g) all-purpose flour, 2 ½ teaspoons baking powder, and 1 teaspoon salt. Whisking helps evenly distribute the leavening agent and salt throughout the flour, ensuring even rise and balanced flavor in every bite. Set this dry mixture aside.
- Cream the Peanut Butter and Sugars: In a medium mixing bowl, or in the bowl of a stand mixer fitted with the paddle attachment, add 1 cup (240 g) creamy peanut butter, ½ cup (100 g) granulated sugar, and ½ cup (100 g) packed light brown sugar. Beat on medium speed for about 2–3 minutes until the mixture becomes light, smooth, and creamy. This step not only blends the ingredients but also incorporates a little air for a softer texture in the finished bread.
- Add the Eggs and Vanilla: Crack in one egg at a time, beating well after each addition so the mixture remains smooth and emulsified. Once both eggs are incorporated, pour in 1 teaspoon vanilla extract and mix again until evenly distributed. Scrape down the sides of the bowl with a silicone spatula to ensure no unmixed bits remain.
- Incorporate the Dry Ingredients: Reduce your mixer speed to low. Gradually add the dry flour mixture you prepared earlier, allowing it to mix just until most of the flour is no longer visible. This prevents overmixing, which can make the bread dense instead of tender.
- Blend in the Buttermilk: While the mixer is still on low speed, slowly pour in 1 cup (240 mL) buttermilk. The batter will loosen up considerably and become more pourable — this is completely normal. Continue mixing until everything is fully combined, then stop immediately to avoid overworking the batter.
- Add the Chocolate Chips: Remove the bowl from the mixer stand. Add ⅔ cup (112 g) chocolate chips (any combination of milk, semi-sweet, or mini chips works well). Using a large spatula, gently fold the chips into the batter. Folding helps evenly distribute the chocolate without breaking or melting it prematurely.
- Fill the Loaf Pan: Pour the batter into the prepared loaf pan, spreading it evenly to reach all corners. For an extra touch of texture and sweetness, sprinkle a light layer of coarse sugar over the top.If you like, scatter a few additional chocolate chips across the surface for a bakery-style look.
- Bake the Bread: Place the loaf pan in the center of your preheated oven. Bake for 52–58 minutes, checking for doneness at the 50-minute mark. The bread is ready when a toothpick or cake tester inserted into the center comes out mostly clean, with just a few moist crumbs clinging to it (melted chocolate smears are fine).
- Cool the Bread Properly: Once baked, remove the loaf pan from the oven and set it on a cooling rack. Let the bread cool completely in the pan — this helps it set and prevents it from falling apart when sliced. Once fully cooled, lift it out using the parchment overhang (if used) or gently loosen the edges with a butter knife before removing.
- Slice and Store: Cut the bread into 12 slices using a sharp serrated knife for the cleanest cuts. Store at room temperature in an airtight container or wrapped tightly in plastic wrap for up to 5 days. For longer storage, wrap well and freeze for up to 3 months; thaw overnight in the refrigerator or on the counter before serving.
Notes
- Use creamy no-stir peanut butter for the best texture; natural varieties can cause the bread to be oily or crumbly.
- A mix of chocolate chip sizes (standard and mini) gives a more even distribution of chocolate in every bite.
- For homemade buttermilk, combine 1 cup milk with 1 tablespoon lemon juice or white vinegar and let it sit for 5–10 minutes.
- Let the bread cool fully before slicing to avoid it breaking apart while cutting.
- Lightly tent the loaf with foil in the last 10 minutes if the top browns too quickly.
- This bread is freezer-friendly — slice before freezing for grab-and-go snacks.
- Use a serrated bread knife for the cleanest, crumb-free slices.
- Coarse sugar on top adds a bakery-style crunch and extra sweetness.
- You can swap chocolate chips for chopped chocolate chunks for a more rustic look.
- This recipe doubles well — bake two loaves and freeze one for later.
Peanut butter provides a plant-based protein boost and heart-healthy monounsaturated fats, making it more satisfying than your average sweet bread.
The use of buttermilk keeps the loaf tender while adding a subtle tang, balancing the sweetness beautifully.
Chocolate chips bring an indulgent touch, transforming this into both a snack and a dessert option.
Quick to prepare in just 10 minutes of active time, this bread is ideal for busy weekdays, lunchbox additions, or even make-ahead freezer storage.
With a generous yield and a recipe that stays fresh for days, it’s a smart, flavor-packed addition to your everyday baking rotation.
Must-Have Tools for Perfect Results
9×5-Inch Nonstick Loaf Pan
Ensures even baking and easy release of the bread without sticking.
A high-quality loaf pan also promotes a consistent golden crust, perfect for all quick bread recipes.
Stand Mixer with Paddle Attachment
Makes creaming peanut butter and sugars effortless, giving you a smooth, lump-free batter in minutes.
Also versatile for everything from bread dough to cookie batter.
Silicone Spatula
Essential for scraping down the mixing bowl to ensure every ingredient is fully incorporated.
Flexible and heat-resistant, it’s a multitasker for both baking and cooking.
Measuring Cups and Spoons Set
Accurate measurements are key for baking success.
A sturdy set ensures precision for both dry and liquid ingredients in all your cooking projects.
Cooling Rack
Allows air to circulate around the bread, preventing sogginess while cooling. Also great for cookies, muffins, and pastries.
Chef’s Secrets for Baking Success
The key to an ultra-moist peanut butter loaf lies in proper ingredient preparation and mixing technique.
Make sure your eggs are at room temperature to help them blend seamlessly with the peanut butter and sugars.
Whisking the dry ingredients before combining ensures the baking powder is evenly distributed, leading to consistent rising.
When adding the flour mixture, keep mixing to a minimum — overmixing can activate the gluten, resulting in a dense loaf.
Buttermilk is a moisture powerhouse here, so don’t skip it; it adds tenderness and a subtle tang that enhances the peanut butter flavor.
Finally, folding the chocolate chips in by hand prevents overworking the batter and keeps the chips from sinking to the bottom.
Serving Suggestions for Maximum Enjoyment
This bread is delicious as-is, but it can easily be elevated for different occasions.
For breakfast, serve a warm slice with a drizzle of honey or a light spread of softened butter.
As an afternoon snack, pair it with a cup of coffee, chai, or a tall glass of cold milk.
For a dessert twist, warm a slice slightly and top it with a scoop of vanilla ice cream and a sprinkle of extra mini chocolate chips.
You can even toast slices lightly under a broiler for a warm, melty chocolate experience that’s perfect for cozy evenings.
Storage Tips to Keep It Fresh
Once completely cooled, store your bread in an airtight container at room temperature for up to 5 days. \
To keep it extra moist, wrap it in plastic wrap before placing it in the container.
If storing for longer, freeze the loaf (whole or sliced) wrapped in two layers of plastic wrap followed by a layer of aluminum foil.
Label with the date to keep track of freshness — it will maintain quality for up to 3 months.
Thaw overnight at room temperature or pop individual slices in the toaster for a quick warm-up.
Frequently Asked Questions
1. Can I use natural peanut butter in this recipe?
Yes, but choose the no-stir variety. Natural peanut butters with separated oil can affect the texture, making the bread too oily or crumbly.
2. What’s the best way to make buttermilk if I don’t have it?
Mix 1 cup of milk with 1 tablespoon of lemon juice or white vinegar, stir, and let it rest for 5–10 minutes until it thickens slightly.
3. Can I substitute whole wheat flour for all-purpose flour?
You can replace up to half of the all-purpose flour with whole wheat flour. Keep in mind the bread will be slightly denser and have a nuttier flavor.
4. How do I prevent my chocolate chips from sinking?
Toss the chocolate chips in a teaspoon of flour before adding them to the batter. This creates a light coating that helps them stay suspended.
5. Can I make this bread without chocolate chips?
Absolutely! You can leave them out for a classic peanut butter loaf or replace them with chopped nuts, dried fruit, or even peanut butter chips.
