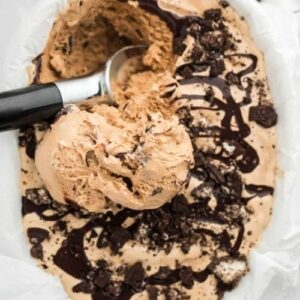
Indulge in this creamy, homemade mocha ice cream featuring a rich coffee-cocoa flavor, swirls of chocolate sauce, and crunchy cookie bits.
Packed with protein from eggs and healthy fats from cream, it’s a satisfying treat that balances indulgence and nutrition.
Perfect for a weekend dessert or summer refreshment, it’s easy to make and delightfully crowd-pleasing.

40-Minute Creamy Mocha Ice Cream
Equipment
- 1 Ice Cream Maker
- 1 Ice Cream Container
- 1 Medium bowl
- 1 Large saucepan
- 1 Whisk
- 1 Fine-Mesh Sieve
Ingredients
For the Ice Cream Base:
- 3 large eggs
- 2 large egg yolks
- 1 ½ cups granulated sugar
- 2 tablespoons cocoa powder
- 2 tablespoons instant coffee
- 2 cups heavy cream
- 2 cups half-and-half
- 2 tablespoons pure vanilla extract
For the Chocolate Sauce:
- 2 tablespoons granulated sugar
- 2 tablespoons unsweetened cocoa powder
- ¼ cup light corn syrup
- 2 tablespoons milk
- 1 tablespoon unsalted butter
- 1 teaspoon pure vanilla extract
For Garnish:
- 5 crushed cookies and cream
Instructions
- Prepare the Egg Mixture: In a medium mixing bowl, crack 3 large eggs and 2 large egg yolks. Use a whisk to beat them together until smooth and slightly frothy. Gradually add 1 ½ cups of granulated sugar, 2 tablespoons of cocoa powder, and 2 tablespoons of instant coffee to the eggs. Whisk thoroughly until the mixture becomes uniform and slightly glossy. This creates the rich, flavorful base for the ice cream.
- Heat the Cream Blend: In a large saucepan, pour 2 cups of heavy cream and 2 cups of half-and-half. Heat gently over medium-low heat, stirring occasionally. The goal is to warm the cream without bringing it to a full boil, which ensures it won’t curdle when mixed with the eggs. You want the cream mixture to feel hot to the touch but not bubbling.
- Temper the Eggs Carefully: To avoid scrambling the eggs, slowly pour 1 cup of the hot cream mixture into the egg-cocoa mixture while whisking continuously. This step gently raises the temperature of the eggs without cooking them too quickly. Once tempered, gradually add the egg mixture back into the remaining cream in the saucepan, stirring constantly. This ensures a smooth, creamy custard base.
- Cook the Custard to Perfection: Place the saucepan back on medium-low heat. Stir continuously, paying close attention to the corners of the pan to prevent sticking. Use a digital thermometer to monitor the temperature; cook until the mixture reaches 170°F. The custard should thicken enough to coat the back of a spoon, and when you draw a line with your finger through the coating, it should hold without immediately merging back together.
- Add Vanilla and Strain: Remove the saucepan from heat and stir in 2 tablespoons of pure vanilla extract for added flavor. Pour the custard through a fine-mesh sieve into a clean bowl to remove any small bits of cooked egg, ensuring an ultra-smooth texture.
- Chill the Custard: Set the bowl of custard into an ice bath (a larger bowl filled with ice and water) and stir occasionally until it cools to room temperature. Cover the surface with plastic wrap to prevent a skin from forming. Once cooled, refrigerate for 2-3 hours until the custard is completely chilled. This step helps the ice cream churn into a creamy, velvety texture.
- Make the Chocolate Sauce: In a small saucepan, combine 2 tablespoons of granulated sugar and 2 tablespoons of unsweetened cocoa powder. Add ¼ cup of light corn syrup and 2 tablespoons of milk, whisking until smooth. Heat over medium heat until it reaches a gentle boil, then reduce to low and simmer briefly. Remove from heat, then whisk in 1 tablespoon of unsalted butter and 1 teaspoon of pure vanilla extract. Allow the sauce to cool completely to create a fudgy swirl for layering.
- Churn the Ice Cream: Transfer the chilled custard into your ice cream maker following the manufacturer’s instructions. Churn until the ice cream reaches a soft-serve consistency. This may take 20-30 minutes depending on your machine. The result should be smooth, creamy, and slightly firm but scoopable.
- Layer with Chocolate Sauce and Cookies: In a freezer-safe container, layer the churned ice cream with cooled chocolate sauce and crushed cookies. Start with a layer of ice cream, drizzle chocolate sauce generously, then sprinkle cookie crumbles. Repeat the layers until all ingredients are used, finishing with a decorative top layer of chocolate sauce and cookie bits for visual appeal.
- Freeze Until Firm: Cover the container with a tight-fitting lid or plastic wrap. Place in the coldest section of your freezer and allow it to harden for at least 4 hours, or overnight for best results.This ensures the ice cream holds its shape while remaining creamy and scoopable.
- Serve and Enjoy: Before serving, let the ice cream sit at room temperature for 5-10 minutes to soften slightly, making scooping easier. Use an ice cream scoop to serve into bowls or cones, and optionally garnish with extra cookie crumbs or a drizzle of chocolate sauce. Enjoy a decadent, homemade mocha ice cream treat that’s rich, creamy, and full of flavor.
Notes
- Always use fresh, high-quality eggs and dairy for the creamiest texture.
- Tempering the eggs is essential to avoid scrambled custard.
- Stir constantly while cooking custard to prevent sticking and ensure smoothness.
- Let the ice cream base chill completely before churning for optimal texture.
- Use an ice cream maker for best results, but the recipe can be adapted for no-churn methods.
- Chocolate sauce can be prepared in advance and stored in the fridge.
- Crushed cookies add texture, but you can substitute with chocolate chunks, nuts, or caramel bits.
- Serve slightly softened for easy scooping and creamier mouthfeel.
- Best enjoyed within one week for peak flavor and texture, though it can be frozen longer.
Chef’s Secrets: Creating Perfect Mocha Ice Cream
The key to exceptional mocha ice cream lies in balancing the coffee, cocoa, and custard base.
Always whisk the eggs thoroughly before combining with sugar and cocoa, and never rush the tempering process—gradually adding hot cream to eggs prevents curdling and ensures silky smoothness.
Gentle, consistent heat while cooking the custard is crucial; avoid boiling, which can cause the mixture to separate.
For a richer flavor, let the ice cream age in the fridge for a few hours before churning.
Adding crushed cookies at the end creates textural contrast, giving the ice cream that indulgent, fudgy bite without overwhelming the coffee-chocolate flavor.
Serving Suggestions: Elegant Dessert Presentation Ideas
This mocha ice cream shines both on its own and as part of a dessert ensemble.
Serve in bowls or cones with extra chocolate sauce drizzled on top for a decadent touch.
For a special occasion, pair it with chocolate lava cake, brownie bites, or espresso-soaked ladyfingers.
Garnishing with crushed cookies or a few coffee beans adds visual appeal.
Individual servings in small glass cups layered with whipped cream or chocolate shavings make it perfect for entertaining.
It’s also ideal as a make-ahead treat for summer parties or family gatherings, satisfying every chocolate and coffee lover effortlessly.
Storage Tips: Keep Ice Cream Fresh Longer
For best results, store your mocha ice cream in an airtight, freezer-safe container.
Smooth the surface with a spatula, press plastic wrap directly onto the ice cream, and seal tightly to prevent ice crystals.
Place it in the coldest part of your freezer for up to two months, though flavor and texture are best within one week.
When ready to serve, let it sit at room temperature for 5-10 minutes to soften slightly.
Chocolate sauce can be stored separately in a small jar in the refrigerator and gently reheated before layering.
Always use clean utensils to avoid contamination and preserve freshness.
Frequently Asked Questions
1. Can I make this ice cream without an ice cream maker?
Yes! For a no-churn version, whip 2 cups of heavy cream to stiff peaks and fold it into the chilled custard base.
Layer with chocolate sauce and cookies, then freeze for at least 6 hours until firm. The texture may be slightly softer but still indulgent.
2. Can I use decaf coffee or espresso powder instead of instant coffee?
Absolutely! Decaf or espresso powder works perfectly. Adjust the quantity to taste, as espresso is stronger.
Both options maintain the mocha flavor without adding excessive caffeine.
3. Can I substitute cookies for a different mix-in?
Yes. Crushed chocolate chips, brownie chunks, nuts, or caramel pieces can replace cookies.
Add them near the end of churning or when layering to maintain texture and prevent sogginess.
4. How do I prevent ice crystals from forming?
Ensure the custard base is fully chilled before churning. Store ice cream in an airtight container with plastic wrap pressed against the surface.
Avoid frequent temperature changes in the freezer, which can cause ice crystals.
5. Can I make the chocolate sauce ahead of time?
Yes, chocolate sauce can be made a day or two in advance and stored in the refrigerator.
Reheat gently before layering it into the ice cream to ensure a smooth, pourable consistency.
