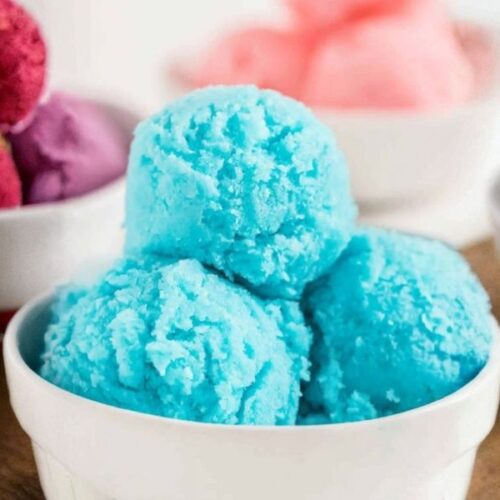
This Kool Aid Ice Cream is a fun, nostalgic twist on frozen desserts that’s as simple as it is delightful.
With only three ingredients and no special churning equipment required, it’s perfect for busy days or spontaneous sweet cravings.

3-Ingredient Kool Aid Ice Cream
Equipment
- 1 Large Mixing Bowl
- 1 Hand Mixer
- 1 Shallow Cake Pan
- 1 Silicone Spatula
Ingredients
- 1 package Kool Aid any flavor
- 1 cup sugar
- 3 cups whole milk
Instructions
- Combine the Base Ingredients: Place a large mixing bowl on your counter to give yourself enough room to work. Add the entire packet of Kool Aid powder to the bowl, followed by the sugar. Pour in the whole milk slowly to help prevent splashing. Using a whisk, stir the mixture thoroughly until the sugar and Kool Aid have completely dissolved.You should see no sugar granules at the bottom of the bowl, and the milk should have taken on a smooth, vibrant color from the Kool Aid. This step is crucial for achieving an evenly flavored and textured ice cream base.
- First Freeze for Firmness: Carefully pour the mixture into a shallow cake pan, spreading it out so the liquid is level across the surface. The shallow design will allow the mixture to freeze more quickly and evenly. Place the pan in the coldest part of your freezer and let it rest undisturbed for about 2 hours, or until the liquid is mostly frozen but still slightly soft in the center. This partial freeze makes the next mixing stage easier and ensures a creamier texture.
- Blend for Creamy Smoothness: Once the mixture is semi-frozen, remove the pan from the freezer. Use a spoon to break up the icy block into manageable chunks and transfer them to a large mixing bowl. With a hand mixer set to medium speed, beat the frozen mixture until it transforms into a creamy, smooth consistency. This aerates the ice cream, breaking up large ice crystals and giving you a lighter, softer texture. Take your time — the smoother you get it now, the creamier it will be later.
- Second Freeze for Final Texture: Pour the blended mixture back into the shallow cake pan, spreading it evenly once again. Return the pan to the freezer and allow it to freeze for an additional 2 to 3 hours, or until completely solid. Avoid opening the freezer frequently during this stage to keep the temperature stable, which helps maintain a smooth, firm texture.
- Serve and Enjoy: When you’re ready to serve, remove the ice cream from the freezer and let it sit at room temperature for 3–5 minutes to soften slightly. Use an ice cream scoop to serve into bowls or cones. Garnish with fresh fruit, sprinkles, or whipped cream if you like. Enjoy your vibrant, flavorful homemade Kool Aid ice cream — a treat that’s as easy to make as it is fun to eat.
Notes
- This Kool Aid Ice Cream is a colorful, no-churn frozen treat that requires only three simple ingredients and minimal effort.
- Its versatility is unmatched — choose any Kool Aid flavor to create your own unique color and taste.
- The key to the recipe’s creamy texture lies in blending the semi-frozen mixture halfway through the process to break down ice crystals.
- While it’s a fun dessert for kids, adults will also appreciate the nostalgic flavors.
- Perfect for warm weather, parties, or quick sweet cravings, it’s a freezer-friendly option you can prepare ahead of time and enjoy whenever you want.
The recipe’s biggest appeal lies in its versatility — you can create endless flavor variations simply by swapping the Kool Aid packet.
While it’s indulgent in nature, the simplicity of ingredients means you control portion size and sweetness.
Whole milk provides a dose of calcium and a small amount of protein, making it a treat that’s not entirely without benefits.
Its smooth, creamy texture paired with vibrant flavors makes it a hit with kids and adults alike.
Best of all, the make-ahead nature makes it ideal for parties, summer barbecues, or anytime you want a refreshing, colorful dessert without spending hours in the kitchen.
Must-Have Tools for Perfect Results
OXO Good Grips Mixing Bowl Set
Perfect for whisking the Kool Aid, sugar, and milk until smooth. The non-slip base keeps the bowl steady, making it easier to mix without spills. Ideal for batters, dough, and salad prep too.
Cuisinart Hand Mixer
Effortlessly blends the semi-frozen mixture into a creamy consistency. Compact yet powerful, it’s great for everything from whipping cream to making cake batter.
USA Pan Nonstick Cake Pan
The shallow design helps the ice cream freeze faster and more evenly. Its nonstick coating ensures easy scooping and is great for brownies, casseroles, and roasting vegetables.
OXO Good Grips Silicone Spatula
Perfect for scraping every bit of the creamy mixture from the bowl into the pan. Heat-resistant and durable, it’s also perfect for stirring sauces or folding batter.
Chef’s Secrets for Smooth Perfection
For the creamiest results, always dissolve the sugar and Kool Aid powder completely before freezing.
This prevents graininess and ensures even flavor distribution.
Using a shallow pan speeds up the freezing process and helps the mixture chill evenly, avoiding large ice chunks.
Don’t skip the blending step — it’s what transforms your ice cream from icy to luxuriously smooth.
If you want an extra-rich texture, substitute part of the milk with heavy cream.
And for an eye-catching presentation, try swirling two different Kool Aid flavors together before the final freeze.
Serving Suggestions for Maximum Enjoyment
Serve your Kool Aid Ice Cream in waffle cones for a nostalgic summer feel, or scoop it into chilled dessert bowls for a more refined presentation.
Top with mini marshmallows, sprinkles, or fruit for added texture and visual appeal.
It pairs beautifully with sugar cookies, brownies, or pound cake for a more indulgent dessert experience.
For a party, set up a “sundae station” where guests can choose toppings like crushed candy, chocolate drizzle, or whipped cream.
Storage Tips to Keep It Fresh
Store the ice cream in an airtight, freezer-safe container to prevent freezer burn and flavor absorption from other foods.
Press a sheet of plastic wrap directly onto the surface before sealing the lid to minimize ice crystal formation.
This dessert is best enjoyed within 2–3 weeks for optimal flavor and texture.
Avoid repeated thawing and refreezing, as it can make the ice cream icy and grainy.
If it becomes too firm, let it sit at room temperature for a few minutes before scooping.
Frequently Asked Questions
1. Can I use reduced-fat milk instead of whole milk?
Yes, but the texture will be less creamy. Whole milk provides the best richness, while lower-fat milk may result in a slightly icier dessert.
2. Can I make it sugar-free?
Absolutely. Use a sugar-free Kool Aid packet and replace the sugar with a sweetener like erythritol or stevia. Keep in mind the freezing texture may differ slightly.
3. How can I make multiple flavors at once?
Simply divide the base mixture into smaller bowls, mix each with a different Kool Aid flavor, and freeze them separately before serving together.
4. Why is my ice cream grainy?
This usually happens if the sugar wasn’t fully dissolved in the milk before freezing. Make sure to whisk thoroughly until the mixture feels completely smooth.
5. Can I add mix-ins like candy or fruit?
Yes! Stir in small chocolate chips, crushed cookies, or chopped fruit after blending in Step 3, just before the final freeze.
