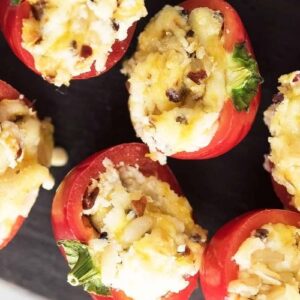
30-Minute Quick Stuffed Cherry Peppers
Bite-sized and bursting with flavor, these stuffed cherry peppers combine creamy cheese, crunchy pine nuts, and fragrant herbs. Ready in just 30 minutes, they’re a protein-rich, fiber-filled, and low-carb appetizer perfect for parties, weeknight meals, or meal prep.
Equipment
- 1 baking tray
- 1 small mixing bowl
- 1 spoon or melon baller
- 1 Oven
Ingredients
- 12 fresh or pickled hot cherry peppers
- 4 oz cream cheese at room temperature
- ¼ cup parmesan cheese grated
- ¼ cup pine nuts
- ½ teaspoon red pepper flakes
- 3 tablespoons fresh parsley minced
- 1 tablespoon garlic minced
Instructions
- Preheat the Oven: Begin by preheating your oven to 450°F (232°C). Ensuring the oven reaches the correct temperature before you start baking will help the cherry peppers cook evenly and allow the filling to turn golden and slightly crispy on top. While the oven heats, you can prepare your ingredients.
- Prepare the Cherry Peppers: Rinse the cherry peppers under cool running water to remove any dirt or residue. Pat them dry using a clean kitchen towel or paper towel. Using a sharp knife, carefully slice each pepper in half lengthwise. Be cautious of the juice, as it can be slightly spicy if using hot cherry peppers.
- Remove Seeds and Membranes: With a small spoon or melon baller, gently scoop out the seeds and white membranes from inside each pepper half. This step not only reduces the heat slightly but also creates a hollow space for the filling. Set the prepared peppers aside on a tray, arranging them with the cut side facing upward so they’re ready to be filled.
- Mix the Creamy Filling: In a small mixing bowl, combine the cream cheese, grated parmesan, pine nuts, minced garlic, red pepper flakes, and chopped parsley. Use a spatula or spoon to mix everything thoroughly until the ingredients form a smooth, slightly thick, and uniform filling. Taste a small portion to adjust seasoning if needed—add more parsley for freshness or more red pepper flakes for extra heat.
- Stuff the Cherry Peppers: Using a spoon or a small piping bag, carefully fill each hollowed pepper with the prepared cheese and nut mixture. Be generous but avoid overfilling, which may cause the filling to spill over during baking. Ensure each pepper is evenly filled so every bite has a perfect balance of flavors.
- Arrange on Baking Tray: Place the stuffed peppers on a baking tray lined with parchment paper or a lightly greased surface.Arrange them in a single layer with enough space between each pepper so the heat circulates evenly in the oven, ensuring uniform cooking.
- Bake Until Golden: Transfer the tray to the preheated oven and bake for 18–20 minutes. Keep a close eye on the peppers during the last 5 minutes of baking. The filling should become lightly golden on top and slightly firm to the touch, while the peppers soften without collapsing.
- Cool Slightly Before Serving: Once baked, remove the tray from the oven and allow the stuffed peppers to cool for 3–5 minutes. This resting time helps the filling set slightly, making them easier to serve and preventing burns from piping-hot cheese.
- Serve with Accompaniments: Transfer the stuffed cherry peppers to a serving platter. They pair wonderfully with a creamy dip, a drizzle of olive oil, or a sprinkle of extra chopped parsley for presentation. These peppers can be enjoyed warm as a satisfying appetizer or snack.
- Optional Storage and Reheating: If you have leftovers, store them in an airtight container in the refrigerator for up to 5 days. To reheat, place the peppers on a baking tray and warm in the oven at 375°F (190°C) for 5–7 minutes or until heated through. They can also be frozen for up to 3 months and reheated using the same method.
Notes
- Choose fresh or pickled cherry peppers depending on your taste preference; pickled peppers add a tangy punch, while fresh peppers provide a crisp texture.
- For a milder version, remove all seeds and white membranes and reduce the red pepper flakes.
- Ensure the cream cheese is at room temperature before mixing to achieve a smooth and creamy filling.
- Pine nuts can be lightly toasted in a dry skillet for extra nutty flavor before adding to the filling.
- Stuff the peppers evenly to prevent spilling and ensure each bite has the perfect balance of cheese, herbs, and crunch.
