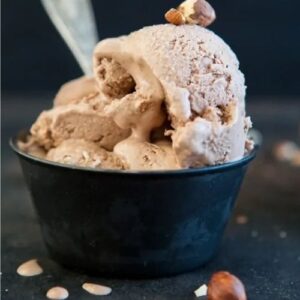
Healthy Chocolate And Hazelnut Vegan Ice Cream
A creamy, dreamy chocolate and hazelnut vegan ice cream made with just five natural ingredients. No-churn and packed with plant-based protein, healthy fats, and fiber, it’s an easy, guilt-free dessert that’s perfect for everyday enjoyment or special occasions.
Equipment
- High-speed blender – 1
- Baking dish – 1 (lined with parchment for easy removal)
- Spatula – 1
Ingredients
- ¾ cup 95 g hazelnuts (plus extra for topping, optional)
- ½ cup 65 g raw cashews
- 1 can 400 ml / 13.52 oz full-fat coconut milk
- 1 ½ tablespoons cacao powder adjust for richer flavor
- ¼ cup 80 ml maple syrup
Instructions
- Prepare the Nuts: Start by gathering your hazelnuts and cashews. If your cashews are raw and not soaked, you can soak them in water for at least 2 hours or overnight for a creamier texture. Drain them well before using. Toast the hazelnuts lightly in a dry pan over medium heat for 3–5 minutes, stirring frequently until they become fragrant. This will enhance their nutty flavor and make the ice cream more aromatic.
- Assemble Your Ingredients: Measure out the remaining ingredients: full-fat coconut milk, cacao powder, and maple syrup. Ensure the coconut milk is well shaken before opening to mix the solids and liquid. Having all ingredients prepped and measured will make the blending process smooth and hassle-free.
- Blend the Base Mixture: Place the toasted hazelnuts, drained cashews, coconut milk, cacao powder, and maple syrup into a high-speed blender. Blend on high until you achieve a completely smooth, velvety consistency. Pause occasionally to scrape down the sides with a spatula to ensure no chunks remain. Taste the mixture and adjust sweetness or cacao level according to your preference.
- Transfer to Freezer-Safe Dish: Line a medium baking dish with parchment paper for easier removal later.Pour the blended mixture into the dish, spreading it evenly. Smooth the surface with a spatula to create a level layer. This helps the ice cream freeze uniformly and makes scooping easier later.
- Initial Freezing: Place the dish in the freezer and allow it to chill for approximately 3 hours or until the mixture is fully firm. Freezing at this stage is crucial to achieving the perfect creamy texture later. Avoid leaving it too long to prevent the ice cream from freezing rock-hard.
- Break and Re-Blend: Once the mixture is firm, remove it from the freezer. Break it into smaller chunks using a spatula or your hands. Return the chunks to the high-speed blender. Blend again until the ice cream reaches a smooth, creamy consistency. You may need to use a tamper or pause occasionally to push the ingredients down, ensuring an even blend.
- Secondary Freezing for Firmness: Transfer the re-blended ice cream back into a freezer-safe container. Smooth the top and cover it with a lid or plastic wrap. Freeze for an additional 30 minutes to help the ice cream firm up slightly, making it easier to scoop. If you prefer a firmer texture, leave it in the freezer a bit longer, but remember it may require a few minutes at room temperature before serving.
- Optional Topping Preparation: While the ice cream is firming, you can prepare additional toppings. Chop or roughly crush extra hazelnuts for a crunchy texture. You may also consider drizzling a small amount of melted dark chocolate or sprinkling cacao nibs for extra decadence.
- Serve and Enjoy: Once the ice cream has reached your desired consistency, scoop it into bowls or cones. Add optional toppings such as extra hazelnuts or cacao nibs for a delightful crunch. Serve immediately for the best creamy texture and flavor. Store any leftovers in an airtight container in the freezer.
- Storage Tips for Best Quality: When storing, press a piece of parchment paper directly onto the surface of the ice cream to prevent ice crystals from forming. Keep the ice cream in a cold section of the freezer and avoid frequent temperature changes. Properly stored, it will maintain its creamy texture for up to 2 weeks.
Notes
- Use high-quality, fresh nuts for the best flavor and creaminess.
- Raw cashews should ideally be soaked for 2–4 hours or overnight to create a smooth texture.
- Full-fat coconut milk is essential for creaminess; avoid light versions.
- Adjust cacao powder to taste if you prefer a more intense chocolate flavor.
- Maple syrup provides natural sweetness, but you can experiment with agave or coconut nectar.
- Freezing times may vary depending on your freezer; check firmness before blending.
- Optional toppings like crushed hazelnuts or cacao nibs enhance texture and flavor.
- Use a high-speed blender for smoothness; otherwise, small nut pieces may remain.
